Optimize the performance of your Webflow pages: The complete guide
Having a fast, high-performance Webflow site is incredibly important for a number of reasons. Not only does it deliver a smooth user experience, but numerous studies have concluded that a few extra seconds in page load speed can decrease a website s conversion, acquisition and customer interaction.
However, user experience is also an important factor in Google s decisions when it comes to ranking your website in their search index. Page speed was included as a factor as early as 2010.
This article explains how you can measure performance and understand performance metrics to improve the performance of your Webflow site.
How to measure the performance of your Webflow site
Although there are several techniques for measuring the performance of a website or page, one of the most common methods is to use performance analysis tools such as Google Lighthouse.**.
This is a tool developed by Google that analyzes websites in 4 categories, including performance. 6 metrics are provided, all of which are linked in one way or another to the performance of a web page.
But how do I use this tool? The easiest way to run Google Lighthouse is to download the extension for Google Chrome

Interpreting Lighthouse results: Core Web Vitals 😜
Navigating the Google Lighthouse dashboard can be as complex as reading a treasure map, but once you know how to decipher the symbols, the treasure trove of performance isn t far away!
Let s focus on the essential web signals, or "Core Web Vitals". You ll find your results in the form of a score. A high score in the areas shown means that your site is not only fast, but also pleasant and stable to navigate.
You ll find 4 main areas:
- Performance
- Accessibility
- Best practices
- SEO

Within the "performance" axis we re analyzing today, you ll find a subset of the metrics Google considers most important. Namely:
- Total blocking time (30%) (CWV)
- Largest content display (25%) (CWV)
- Cumulative layout lag (15%) (CWV)
- First content display (10%)
- Speed index (10%)
- Time to become interactive (10%)
Imagine that every element Lighthouse examines on your Webflow site is a player on a team. Some players, called Core Web Vitals, have a more important role in the team s victory, i.e. in the speed of your site. Lighthouse gives more importance to these key players when rating your site.
This means that to improve your site s rating, it s a good idea to pay particular attention to these Core Web Vitals. Google has highlighted them because they play a major role in quality user experience.
These metrics are therefore Google s preferred criteria for a quality user experience. By interpreting these signals, you have the key to optimizing your site so that it s not just fast, but a pure pleasure to explore!
But now that we ve learned how to analyze the performance of our Webflow site, what do we do?
Improving performance directly in Webflow
It s important to remember that Webflow offers a host of features to enhance your website s performance. Some examples of these features are :
- Asset delivery via CDN
- Code minimization
- Responsive image delivery
- Video transcoding
- CSS & Javascript cleanup functionalities
- CMS management
- Image responsiveness
However, as your site becomes larger and more complex, these features are often not sufficient to guarantee fast loading speeds, especially on mobiles. So you ll need to think about optimizing a number of elements
Optimize the elements you add to Webflow
It may sound "bogus", but the first things to improve when building a site on Webflow are in the import of your content (images, videos, fonts, batchties...).
And the more elements your site contains, the more you ll gain in performance by optimizing your content before importing it into Webflow.
Optimize images before importing them into Webflow
- Choosing the right image format. It s important to choose the right format for your images. Use the SVG format for illustrations and logos, as it allows for lightweight elements that retain their quality regardless of size. For photos without a transparent background, the JPG format is perfect, as it produces a file that s smaller than PNG. However, it doesn t take transparency into account, in which case you ll need to use the PNG format.
- Image size. Webflow adjusts the size of images for different screens, but it s always better to get them right the first time! If your image won t exceed 500px, you certainly don t need to import an image that s 4000px! You can find out how Webflow works to optimize images for all devices and resolutions.
- Make images lighter. There are many free online tools like TinyPNG or ILoveIMG that will allow you to compress all your images. If you don t feel like compressing your images one by one before importing them into Webflow, you can use Optily, which has an application directly on Webflow!
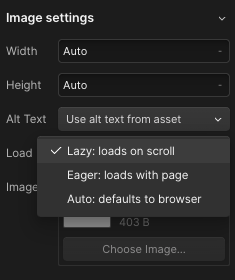
- Use Lazy LoadWebflow loads images bit by bit, so that your page appears faster. But be careful not to use it for important images that need to appear immediately when your site is visited. This is often the case for the hero section of your pages. To select this setting, click on your image, then in "Settings" you ll find the "Load" parameter:
- Use background images only when necessary.Background imagesdon t always adapt well to the different screens on Webflow. So try not to use too many, and opt for "classic" images if your site needs to be responsive.
Video optimization in Webflow
- Make videos lighter by compressing them. As with images, there are many online tools for reducing the size of your videos without sacrificing quality. Tools like Compress Video can help.
- Favor MPEG-4 formatIt s recommended that web videos be in MPEG-4 format (MP4, MV4). Be sure to export and download them in this format.
- Do not use Webflow s native video embedding elementWebflowimports additional Javascript libraries when using its native video embedding element. The ideal solution is to add an "Embed element" to your Webflow site and copy/paste your video code into it.
Choose the right font and import it directly into the parameters of your Webflow project.
- Upload your fonts manually. When setting up your Webflow site, you may be tempted to choose a font directly from Google Fonts or Adobe Fonts using the built-in settings:
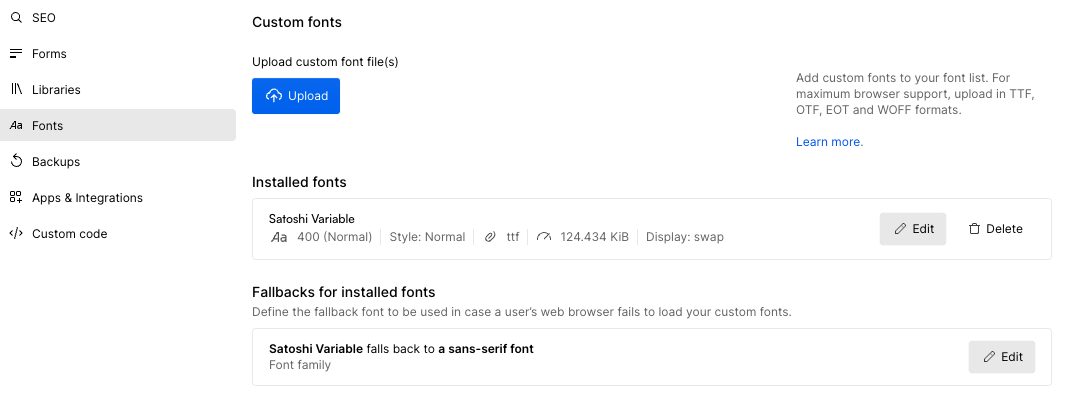
But this isn t the best idea. Why not? Because it forces your visitors browsers to make additional requests to download the font from an external service, which can slow down the loading of your site. The best practice is to download the fonts you intend to use and set them up yourself in your site settings.
Pro tips: Keep the "display: swap" option and add this code to the <head> tag of your Webflow project:
<!-- Please keep this css code to improve the font quality--><style>
{-webkit-font-smoothing: antialiased;-moz-osx-font-smoothing: grayscale;-o-font-smoothing: antialiased;}</style>This will avoid any flash effect from invisible or unstyled fonts when loading.
- Allfontsmust be downloaded by the visitor, except for fonts that may already be installed on their computer. If the design of your Webflow site allows it, try to opt for one of the commonly installed system fonts, such as the classic Arial, or Verdana. How about Comic Sans MS? 🙃
- Limit the number of fonts you use. If you opt for a third-party font (Google, Adobe or others), try to limit the number of different fonts you use and only import the styles you re going to use on your project. The difference between having to load one font versus five different fonts can be enormous in terms of performance.
Limit the import of external Javascript/CSS libraries
Every piece of code added to your site, whether Javascript or CSS, needs to be processed by your visitors browser. And while Webflow is pretty (very) good at keeping its own code light, as soon as you start adding external code, your site s speed can start to suffer.
This is often what causes the most common headaches among Webflow users, such as warnings suggesting you reduce main processor activity, decrease Javascript execution time or eliminate code that isn t being used.
Fortunately, there are several strategies you can adopt to remedy these problems.
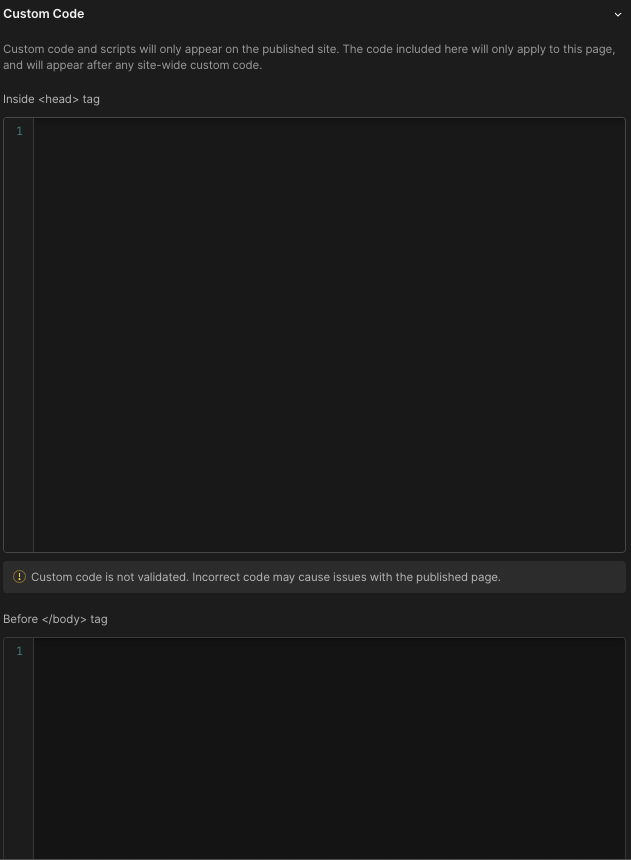
Put your scripts in the right place
Importing scripts into your site settings makes sense when using tools such as Google Analytics or adding a cookie banner.
However, if you re importing a script to run a slider present only on your home page, it s best to place the code only in the page parameters.
Place your Javascript scripts before the body closing tag
The code on a web page is parsed from top to bottom by the browser. This means that if you leave your scripts in the head tag, they have to be fully downloaded and parsed before you can even begin to parse the actual HTML of the page.
So it s best to import the script at the end of the page, unless you need to load the script directly when the page loads.
Use async or defer attributes
For each script you import, you can use async or defer attributes. These attributes are used to eliminate rendering blocking during script loading.
The async attribute
The "async" attribute allows scripts to load in parallel without blocking the rest of the page. In other words, other scripts will not stop loading or executing to wait for an "async" script, and vice versa. This means that the "DOMContentLoaded" event, which signals that the HTML is fully loaded and the DOM is built, can be triggered before or after an "async" script has finished loading, depending on its size or whether it was already cached.
Using the async attribute on scripts looks like this:
<script async src="https://mon-script.com"></script>

The defer attribute
The "defer" attribute is an instruction you give the browser to load the script at the same time as it works on the rest of the page, without pausing it. The browser will therefore continue to organize the HTML and assemble the DOM in peace. Meanwhile, the script loads discreetly behind the scenes and waits for the DOM to be ready before executing.
Using the defer attribute looks like this:
<script defer src="https://mon-script.com"></script>
But how do I know whether to use async or defer?
The choice between async and defer depends on several factors linked to your script and the way you want it to interact with the loading of your web page.
If you choose async, it s like having several little kitchen robots working for you. Each one does a different task (like peeling vegetables or mixing cake batter) as soon as it s switched on. They don t care what the others are doing; they just start working on their task immediately, without waiting for the others to finish.
Now, if you choose defer, it s like having a team of chefs following a recipe step by step. They wait until you ve finished preparing the table and everything is ready before serving the dishes in the order they re to be eaten, like the starter before the main course.
Basically, use async when order isn t important and you want things to be ready as soon as possible, and defer when there s an order to keep things running smoothly.
Implement best practices right from the start of your site s construction on Webflow
Webflow is an extraordinary tool for building a web site, but it s important to bear in mind that your bad practices can have a negative impact on your site s performance. After building over 50 sites on Webflow, we can say that respecting the following points will help you gain performance points on Lighthouse:
- Use a Webflow development framework and a Style GuideTokeep CSS code as light as possible, it s always a good idea to follow a design system such as the "Client-First" methodology. This can help you keep a component structure instead of creating new classes for everything (and thus avoid the infamous "div block 148" 😬)Consider setting up a comprehensive Style Guide that will include all your important classes for use in your project. You can also clone the "Client-First official starter project" to get you started even more easily!
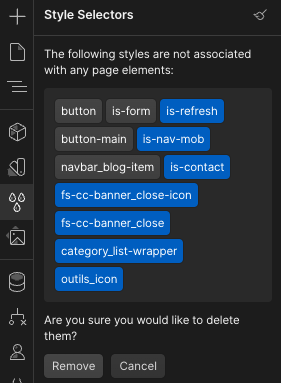
- Use Webflow s cleaning functions. Webflow features a number of clean-up functions for generated code. You can automatically delete all unused CSS classes by opening the "Style Selectors" :
You can also delete your unused interactions by opening the "Interactions" panel, then clicking on "Clean Up" :
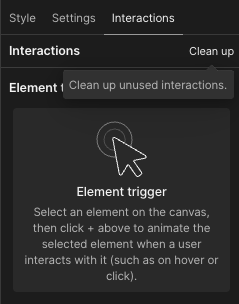
Get into the habit of using these tools whenever you make major changes to your site.
- Avoid using Webflow native elements and prefer div blocks. You may be tempted to use "pre-fabricated" Webflow elements such as "columns" or "sections". These features are now considered obsolete and/or limiting. Today, it s much simpler for your design to use a div block with a display: grid, for example,and you ll find a very good explanation of this from Pixel Geek.
- Create reusable animations. Avoid creating a new interaction if you can use an existing one. This will reduce Javascript code.
- Minimize the total use of animations. As we all know, Webflow allows you to create sites with numerous animations. These sites are often breathtakingly beautiful in terms of design. Unfortunately, all these animations have an impact on performance. Always keep in mind the main objective of your website: if you re creating a marketing site to drive traffic to your products or services, it s best not to "overdo it" when it comes to animations. This is not only to reduce code, but also to facilitate the user experience. On the other hand, if your goal is to win a prize on Awwwards, then you can go all out 😜
- Favor CSS animations over Webflow interactions
It s often fun to create native Webflow interactions to change the font color or background of a div block. But before you create your interaction, ask yourself whether this animation couldn t be handled directly in CSS. This is often the case for hover states, for example. If animation is possible in this format, you should avoid creating it via the interaction panel.
Conclusion
In summary, optimizing the performance of a Webflow site is crucial for a quality user experience and better SEO ranking. Analysis tools such as Google Lighthouse offer an in-depth view of what needs to be improved, with a focus on Core Web Vitals. Webflow s integrated features, such as delivery via CDN, code minification and responsive image management, are a good place to start. However, further optimization is often required, particularly for imported content such as images, videos and fonts. By following rigorous practices from the outset of your site s construction, limiting the import of external libraries, and implementing Webflow s cleanup features, you can significantly improve your site s loading speed. Keep in mind that every kilobyte saved contributes to better overall performance, which translates into an improved user experience and, ultimately, better customer conversion and retention.


